
New sod changes a yard’s appearance immediately. A durable lawn takes longer. The grass must grow roots into the soil, receive enough water without staying saturated, and be maintained according to its species and season.
That distinction matters in Chapel Hill, Carrboro, Durham, Pittsboro, Cary, Hillsborough, Graham, and the surrounding Triangle. A sunny yard exposed to summer heat has different needs from a shaded lawn beneath mature trees. Construction-compacted clay behaves differently from a sandy planting bed. A maintenance plan that works for Bermuda can harm a fescue lawn if it is copied without adjustment.
This guide follows the whole project: deciding whether sod is appropriate, selecting grass, preparing the site, coordinating delivery, installing it, protecting new roots, and moving into year-round care. It includes species-specific reference tables, practical calculators, troubleshooting, and a printable new-sod plan. Use the calendar as a planning aid, then adjust it to the actual grass, cultivar, soil, weather, and installer’s instructions.
The most valuable preparation happens before the first pallet arrives. A new surface cannot make deep shade disappear, correct a drainage problem, or reverse compaction beneath it.
1. Sod, Seed, or a Different Landscape: Choose the Right Project
Sod is established turf harvested with a thin layer of soil and roots. It provides rapid coverage, but the roots have been cut during harvest. Until they reconnect with the planting bed, the lawn is vulnerable to drying, displacement, and traffic.
Sod may make sense when you need quicker coverage, are replacing a clearly defined damaged area, or want a grass cultivar that is normally established vegetatively. Seed can be a more economical option for an appropriately timed fescue renovation, provided you can protect the seedbed and wait for establishment. Plugs can reduce material costs for some spreading warm-season grasses, but exposed ground remains while they fill in.
| Approach | Main advantage | What to plan for |
|---|---|---|
| Full sod installation | Rapid, uniform coverage | Preparation, delivery, immediate watering, and protection while roots establish |
| Fescue seeding or overseeding | Lower material cost and flexible renovation | Seasonal timing, germination care, erosion and weed competition |
| Warm-season plugs or sprigs | Less planting material | Longer fill-in period and species-specific weed management |
| Targeted sod replacement | Repairs a defined damaged area | Match the existing cultivar and correct the cause of the damage |
| Mulch, planting beds, or another surface | Fits places where turf repeatedly struggles | Site-appropriate planting and drainage design |
Do not make grass the default for every square foot. A narrow, heavily shaded side yard or a steep runoff channel may be better served by a different landscape treatment. Sod is living material, not a substitute for a site design.
Before comparing prices, define the result you want: usable play space, summer durability, winter color, easier mowing, reduced bare ground, or a consistent front lawn. Those goals help determine whether full replacement is worth doing.
2. The Best Grass Types for North Carolina Homeowners
North Carolina spans mountains, Piedmont, and coastal plain. The Triangle sits in the transition zone, where summer heat challenges cool-season lawns and winter cold limits some warm-season options. There is no single best sod for the entire state.
Coob’s current sod service page identifies fescue, Bermuda, and zoysia as its options. The other grasses below provide statewide context; confirm availability and suitability before assuming Coob’s installs them.
Compare care needs
Choose a grass to explore its care profile
Tall fescue
Cool-season growth; moderate shade tolerance. Prioritize fall renovation and watch summer stress. Established watering reference: about 1 inch weekly including rain. Mow about 2.5–3.5 inches. Confirm the cultivar and soil plan.
A comparison aid, not a site-specific grass recommendation. Coobs’ listed options are fescue, Bermuda and zoysia.
Turf-Type Tall Fescue
Fescue is a frequent choice for Piedmont homeowners who value cool-season color and have a mix of sun and moderate shade. It grows most actively in cooler weather. Summer irrigation capacity and disease awareness matter, especially on exposed sites.
Most tall fescue grows in bunches rather than spreading aggressively across bare ground. Thin areas often need fall renovation. Ask which cultivars are in the sod, whether it includes Kentucky bluegrass, and how replacements should be matched. Deep shade remains a limitation even when a product is described as shade tolerant.
Bermudagrass
Bermuda is suited to sunny, active lawns. Its spreading growth helps it recover from wear during the growing season, but it also needs edging to stay out of beds. It turns brown during winter dormancy; this is a normal seasonal characteristic, not automatically a disease.
A lawn intended for frequent play needs a realistic mowing plan. A very low Bermuda surface requires appropriate equipment and a sufficiently even grade. Do not select a fine-textured cultivar based only on a picture if its care requirements exceed what you want to maintain.
Zoysiagrass
Zoysia forms dense turf and can be appropriate for sun or light shade, depending on cultivar. It generally recovers from damage more slowly than Bermuda. Consider that difference when the same dog path or play area receives repeated traffic.
Fine- and coarse-textured zoysias have different mowing requirements. Ask about cultivar, mower compatibility, shade conditions, and establishment timing. Zoysia’s dormant winter color should be part of the purchase decision.
Centipedegrass and St. Augustinegrass
Centipede is a lower-input warm-season option in suitable sites, especially farther east. It is not the grass to choose for heavy traffic or a high-fertilizer program. Its pH and nutrient management differ from many other lawns.
St. Augustine is more relevant to warmer portions of the state and has cold-tolerance limitations. A cultivar suited to one coastal yard is not automatically a good recommendation for a Triangle property. It also requires a taller mowing height than a closely cut Bermuda lawn.
Kentucky Bluegrass and Fine Fescues
These are chiefly cool-season options for appropriate climates or mixtures. Kentucky bluegrass may be part of a fescue sod blend; fine fescues may be useful in certain shaded, lower-maintenance situations. Neither should be assumed to be a universal standalone solution for hot Triangle yards.
| Grass | Typical fit | Main trade-off | Established mowing reference |
|---|---|---|---|
| Tall fescue | Piedmont sun to moderate shade; cool-season color | Summer stress; bare areas do not rapidly fill by spreading | About 2.5–3.5 inches; favor the higher end in summer |
| Bermuda | Full sun; active summer use | Winter dormancy; frequent mowing and edging | Often 1–2.5 inches with a rotary mower; cultivar and site dependent |
| Zoysia | Sun to light shade; dense turf | Slower repair and potential thatch | Often 1–2 inches; confirm cultivar and mower |
| Centipede | Suitable lower-input sites, often farther east | Poor wear tolerance; sensitive to excess inputs | About 1–2 inches |
| St. Augustine | Suitable warmer sites | Cold limits and coarse texture | About 2.5–4 inches |
These are reference ranges, not instructions to lower a newly installed lawn. Follow the cultivar recommendation and confirm that the sod is anchored before mowing. See NC State’s grass selection guide and the species calendars in the sources section.
3. When to Install Sod in North Carolina
The best installation window gives roots time to establish during favorable growing conditions. Being able to lay sod on a particular date is different from choosing the lowest-risk date.
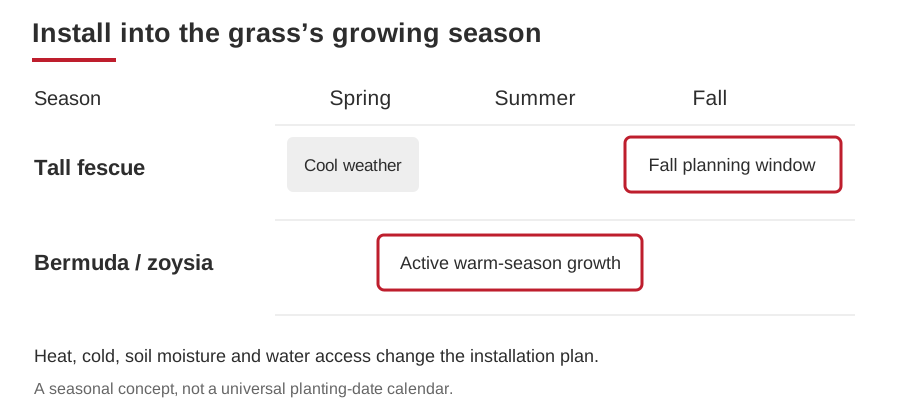
For tall fescue in the Triangle, cooler growing conditions—especially early fall—are often useful. Spring installation may be possible, but the lawn has less time before summer heat. Summer fescue installation requires particularly careful moisture management and a plan for heat stress.
Bermuda and zoysia generally benefit from installation during active warm-season growth, commonly late spring into early summer. Dormant-season installation can be done in some circumstances, but rooting slows and the calendar for use and mowing extends. Do not apply the active-growth first-month schedule unchanged to dormant sod.
Postpone when the ground is frozen, saturated, or unworkable; when a major washout risk is unresolved; or when reliable watering will not be available. A pallet delivered before a vacation creates a care problem, even if the weather otherwise looks suitable.
Ask the installer to explain the proposed date, the likely rooting conditions, and what will change if the weather turns unusually hot, cold, or wet. NC State discusses planting seasons and sodding windows; these broad windows should be adapted to the actual site.
4. Measure, Budget, and Plan Before Ordering
Measure the area receiving sod rather than the entire lot. Divide irregular spaces into rectangles, triangles, or other measurable shapes. Subtract beds, paths, structures, and areas that will remain another surface. Confirm what each pallet or roll covers with the supplier; there is no universal pallet size.
A cutting allowance may be needed around curves and small obstacles. Agree on that allowance with the installer instead of automatically ordering a large surplus. Sod cannot be stored like unused stone: extra material still needs prompt installation and watering.
Measure before you order
Homeowner planning calculators
Use measured inputs. These tools estimate quantities; they do not prescribe watering or fertilizer rates.
Sod order area
Water volume and measured sprinkler runtime
Subtract effective rainfall when deciding planned depth. Runtime excludes soak pauses and assumes even coverage. Correct uneven coverage first.
Fertilizer product weight
The default is a math example. Select the rate from the grass/soil plan and label. Do not use this example automatically on new sod.
For example, a 40-by-60-foot rectangular lawn is 2,400 square feet before deductions. If a bed occupies 200 square feet, the net sod area is 2,200 square feet. An agreed 5% cutting allowance brings an example order to 2,310 square feet. This is a measuring example, not a recommendation for every project.
A useful written estimate separates the sod and cultivar, removal of the existing lawn, soil preparation, grading or drainage work, delivery, installation, and any agreed aftercare. Clarify equipment access, gate widths, where pallets will be placed, and who removes packaging and surplus material.
Ask who will water the lawn after the crew leaves. If you are responsible, test the hoses or irrigation beforehand. A clear care handoff belongs in the project plan, not as a surprise after installation.
5. Assess Sunlight, Grade, Drainage, and Existing Damage
Walk the site at different times of day. Look at actual light reaching the ground, not simply whether the yard is labeled “sunny.” Tree growth, buildings, fences, and seasonal leaf cover can change conditions across one lawn.
After rain, note water collecting in depressions, downspout discharge, runoff crossing the yard, and areas that stay soft. If the old grass died repeatedly in the same place, describe that pattern to the installer. A spot that fails every year deserves a diagnosis before it receives new turf.
Protect building drainage and do not redirect water onto a neighbor. Account for the finished sod thickness at sidewalks, patios, and irrigation heads. Keep drainage inlets accessible. Major grading near foundations, trees, utilities, or property boundaries should be assessed as site work, not treated as routine raking.
For excavation or grading, arrange utility location through the appropriate process and identify private lines separately. Mark irrigation, invisible pet fences, septic components, and other features that may not be included in public utility markings.
Sod can help cover soil, but it does not cure standing water. Where runoff or drainage is the cause of lawn failure, consider Coob’s drainage and erosion control services and yard grading before finalizing the planting area.
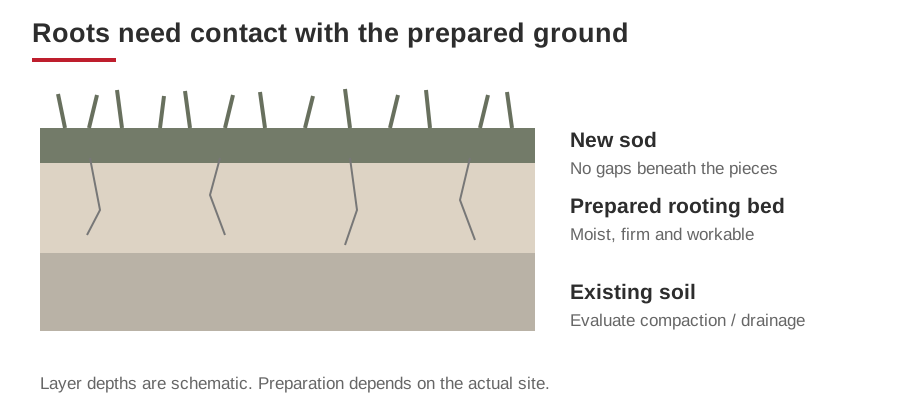
6. Soil Preparation: Build a Rooting Bed, Not Just a Smooth Surface
Start with a Soil Test
A soil test helps identify pH and nutrient needs before the ground is covered. Sample distinct areas separately if they have different soil or problems. Follow NCDA&CS instructions for the situation being tested and identify the intended grass accurately; a centipede recommendation differs from a fescue recommendation.
NCDA&CS currently directs homeowners to combine cores from 8–10 locations for a representative sample and lists a 4-inch sampling depth for established lawns. New-lawn preparation may require a different sampling approach; confirm it with the lab or your county Extension center. Use a clean plastic bucket and the official sample box. Soil sampling instructions.
Remove the Old Lawn and Unwanted Material
Do not lay sod over existing turf, a mat of dead grass, or construction debris. Specify how weeds and unwanted grass will be controlled before installation. If a herbicide is used, its planting interval and intended use must fit the project; a generic “weed killer” is not a complete plan.
Remove stones, roots, rubbish, and unsuitable material from the rooting area. Construction sites sometimes need more than surface cleanup because equipment has compacted the soil or buried debris. UGA Extension’s soil preparation explanation describes why the underlying bed matters.
Relieve Compaction and Choose Amendments Deliberately
The objective is a workable rooting layer with appropriate moisture movement, not a thick blanket of unfamiliar topsoil over a hard slab. Evaluate the depth and condition of usable soil. Incorporate suitable amendments where they are needed and where existing roots, utilities, and soil conditions allow the work.
Do not prescribe lime, gypsum, sand, or compost to every clay yard. Lime changes pH; it is not a universal compaction treatment. Imported soil also needs evaluation for texture, weeds, and compatibility. If adding topsoil, discuss how it will blend with the existing bed and affect final elevations.
Finish Firm, Smooth, and Moist
Eliminate abrupt humps, loose pockets, and depressions. Allow settling and correct low places before delivery. The surface should support installation without deep footprints, while remaining suitable for root penetration. Work soil when it is workable, not while saturated.
Immediately before laying, the soil should be moist without being muddy. Sod placed on hot, dry ground starts at a disadvantage; sod laid on a puddled bed also struggles. Preparation and delivery should be coordinated so the ready bed does not sit exposed and erode.
7. Delivery and Installation: A Homeowner’s Walk-Through
Freshness and coordination matter. Confirm the cultivar, coverage, delivery time, and installation readiness before harvest or dispatch. Arrange enough labor and water to keep pace with the delivery.
Inspect the delivered material for obvious deterioration, excessive weeds, and consistency with the order. If something appears wrong, contact the supplier or installer promptly and document it before the entire lawn is laid. Do not assume hot or discolored rolls will recover simply because they are watered later.
A practical installation sequence is:
- Confirm the prepared grade and functioning water supply.
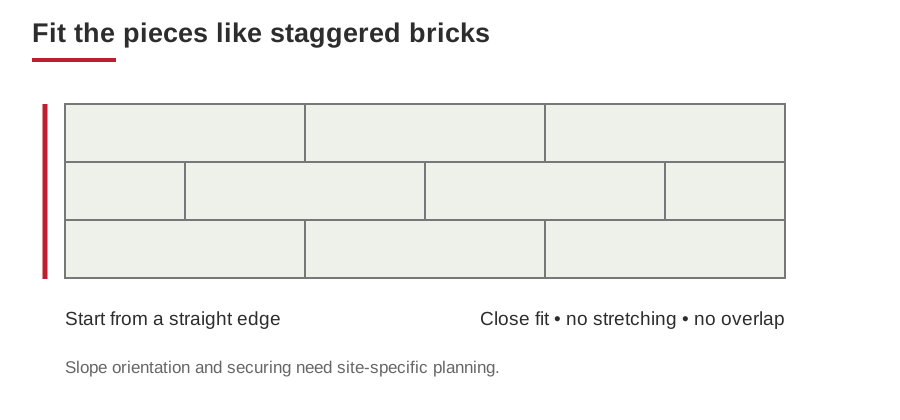
- Begin along a straight edge and work systematically across the area.
- Stagger the end joints. Fit edges together without gaps, overlap, or stretching.
- Cut cleanly around beds and hardscape; avoid thin scraps along exposed edges where practical.
- On slopes, orient and secure the sod appropriately to resist sliding.
- Establish good contact with the soil using suitable light rolling or tamping, without compacting a wet bed.
- Water completed sections promptly and verify moisture beneath them.
- Finish with a walkthrough covering seams, edges, coverage, and aftercare responsibilities.
Avoid leaving rolled or stacked sod in the sun while unrelated tasks are completed. Installation should follow delivery promptly; warm conditions can shorten how long harvested sod remains usable. A crew that waters finished areas as work progresses reduces the time newly placed roots spend drying.
The basic fitting and contact principles are supported by NC State’s sodding guidance and Clemson’s lawn establishment guidance. Timing and water management should follow the local installer’s plan.
8. Watering New Sod: Establishment Comes First
Installation Day
Water promptly enough to wet the sod and the soil immediately beneath it. Lift a corner briefly to check several representative areas, then put it back in place. A green surface does not prove that the soil interface is wet.
Check edges, slopes, sunny areas, and the spaces between sprinkler patterns. Stop water from running off or ponding. If the surface sheds water before the bed is moist, use shorter cycles with soak time between them rather than running one uninterrupted cycle.
The First Week
Check moisture at least morning and midday during suitable active-growth installation conditions; check more often in heat, wind, or exposed areas. Water as needed to keep the sod and interface moist. Many installations need daily watering and some need additional short applications, but rain, soil, and temperature can substantially change the requirement.
There is no reliable universal instruction to “run every sprinkler for 20 minutes.” Output, pressure, spacing, and soil intake differ. Use measured coverage and physical checks to decide the runtime.
As Roots Begin to Attach
Gently test a few edges without repeatedly lifting whole pieces. Increasing resistance is a useful sign of anchoring. Gradually lengthen the interval between irrigations and wet more of the developing root zone. If the turf wilts or the interface dries during the transition, reassess before making another reduction.
After Reliable Establishment
Move toward the grass-specific established-lawn plan. The first month is a monitoring period, not a guarantee that roots are deep enough for normal traffic. Cold-weather or dormant installations may stay in an establishment phase far longer than actively growing sod.
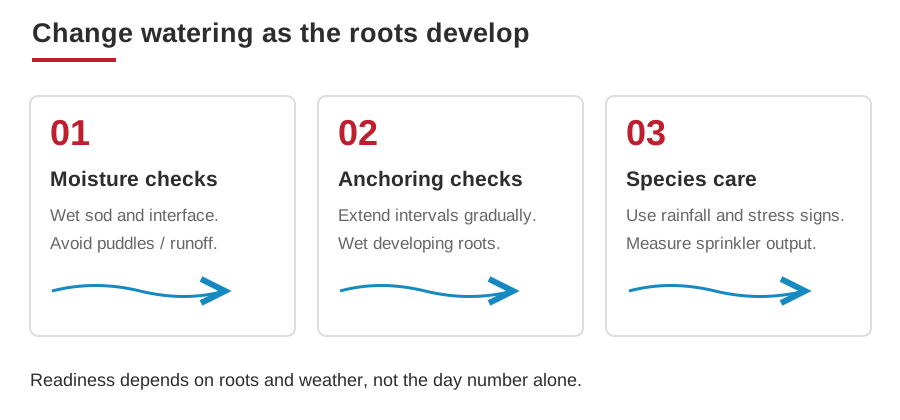
Moist is different from saturated. Persistently squishy ground, puddles, sour conditions, or severe runoff call for an adjustment and possibly a drainage review. Conversely, curled leaves and drying edges need prompt attention. Clemson distinguishes new-sod rooting care from established lawn irrigation.
9. Established Watering Schedules by Grass Type
The amounts below refer to established, actively growing lawns, including useful rainfall. They are starting references for keeping turf growing, not daily prescriptions and not the first-week sod schedule.
| Grass | Weekly water reference during active growth | How to apply it | Seasonal adjustment |
|---|---|---|---|
| Tall fescue | About 1 inch total | Split as needed for soil intake; check root-zone moisture and wilt | Heat and drought require monitoring; do not assume brown turf is dead |
| Bermuda | About 1 inch total | Less frequent, deeper watering after rooting; cycle-soak on clay | Reduce with cooler weather, rain, and dormancy |
| Zoysia | About 0.5–1 inch total | Adjust to weather, cultivar, soil, and stress signs | Lower demand during dormancy; avoid routine daily irrigation |
| Centipede | About 1 inch total | Adjust for sandy soils and actual drying | Reduce in cool weather; do not manage like newly laid sod |
| St. Augustine | About 1 inch total | Monitor coverage and root-zone moisture | Reduce when dormant or when rainfall supplies the need |
NC State’s fescue, Bermuda, zoysia, centipede, and St. Augustine calendars provide these broad references.
Measure Sprinkler Output
Place several identical straight-sided containers across a zone. Run it for a measured period and compare water depths. Large differences identify coverage problems; increasing the whole zone’s runtime may drown one area while another stays dry.
Example: if the average catch is 0.25 inch in 15 minutes, the average application rate is 1 inch per hour. Delivering 0.5 inch would take roughly 30 minutes at that measured rate, before dividing into soak cycles where necessary. Measure each zone rather than copying one result across different sprinkler heads.
One inch over 1,000 square feet equals about 623 gallons by geometric conversion. A 3,000-square-foot lawn receiving a net half-inch needs about 935 gallons delivered over that area, before accounting for system losses. The calculator helps estimate volume; it does not determine your lawn’s biological need.
Favor early-morning watering for established lawns and subtract effective rainfall. A controller should change with conditions, not repeat a summer setting all winter. See Water Requirements of North Carolina Turfgrasses for the relationship between grass demand, climate, and irrigation.
Dormancy Is Not the Same as Abandonment
Some established lawns can be allowed to reduce growth or go dormant during drought. That is a different goal from keeping them green. Newly installed turf should not be intentionally dried into dormancy before it has established. Discuss prolonged drought and winter moisture needs with your installer or Extension; do not use an active-growth weekly target unchanged in every season.
10. First Mowing, Traffic, and Everyday Mower Care
Mow when the sod is anchored, the ground can support the mower without ruts, and the grass is tall enough to require cutting. Check all three. A fixed “day 10” instruction ignores cold soil, shade, and saturation.
Use a sharp blade and remove no more than roughly one-third of the blade height at one mowing. Avoid sharp turns and heavy equipment while the lawn is still tender. If the first cut is overdue, work the height down gradually instead of removing most of the leaf at once.
Keep the mower height appropriate for the grass. A height suitable for Bermuda can scalp tall fescue. Fine-textured zoysia may require different equipment from a coarser cultivar. Leave manageable clippings on the lawn; break up or remove heavy clumps that smother grass.
Keep children’s play, pet traffic, and parked equipment off new sod until it is sufficiently anchored and firm. Repeated foot traffic along the same path can damage even a rooted lawn. Establish a temporary pet route and discuss access around the house before installation.
For ongoing care, record your mower’s actual cutting height and sharpen blades regularly. Frayed leaf tips can make a lawn look pale and stressed even when the soil and watering are reasonable.
11. Fertilizing Schedule: Match Nutrients to Grass and Season
Fertilizer is not a substitute for adequate light, drainage, or roots. Start with soil testing and the grass species. Use phosphorus, potassium, and lime when the test and site require them; do not add them simply because a bag is labeled “starter” or “winterizer.”
An establishment application, if needed, belongs in the preparation plan. Avoid automatically repeating fertilizer immediately after installation when nutrients were already incorporated. Once sod has established, transition into its species program.
| Grass | Broad timing for an established lawn | Reference application approach | Avoid this mistake |
|---|---|---|---|
| Tall fescue | Main feeding in fall and late winter; lighter spring adjustments if needed | NC State lists 1 lb N/1,000 sq ft in September and November, and 1 lb in February | Forcing lush growth on heat-stressed or diseased turf |
| Bermuda | After full green-up, then during active summer growth | Initial 0.5–1 lb N/1,000 sq ft; summer references use about 1 lb every 4–6 weeks | Feeding dormant grass or continuing summer timing into cold weather |
| Zoysia | Several weeks after green-up, then measured summer applications | About 0.5 lb N initially; 0.5–1 lb in late June/early July and mid-August in the NC calendar | Copying an intensive Bermuda program or building excess thatch |
| Centipede | Modest feeding after green-up; NC basic calendar starts no earlier than mid-May | Basic calendar: 1 lb N/1,000 sq ft in mid-May; extra feeding is condition dependent | Heavy nitrogen, unnecessary lime, or phosphorus where levels are adequate |
| St. Augustine | After green-up in late spring and during active summer growth | NC calendar starts with 0.5 lb N in May or two weeks after green-up, whichever is later | Copying fescue timing or fertilizing for color without checking the cause |
These are reference examples from the linked species calendars, not a fertilizer prescription for unrooted sod or every lawn. Cultivar, soil report, clippings, product release rate, and lawn goals change the plan. The table is intended to show seasonal differences; review the full calendar before selecting rates.
Read the Bag Correctly
The first number in a fertilizer analysis is percent nitrogen. If an appropriate recommendation is 0.5 pound of nitrogen per 1,000 square feet, a 20%-nitrogen product supplies it at 2.5 pounds of product per 1,000 square feet. For 4,000 square feet, that example requires 10 pounds of product.
Weigh the material, calibrate the spreader, and keep it off sidewalks and drains. Product weight and nutrient weight are different. Using the fertilizer calculator does not make the selected nitrogen rate appropriate; that rate must come from the soil/species plan and label.
Avoid broadcasting before a heavy storm or onto saturated soil. Apply water after treatment only as instructed by the specific product. A combined fertilizer-and-herbicide product may be unsuitable for new sod even when its nutrient analysis appears reasonable.
12. Disease Management: Diagnose Before Treating
A brown patch is a symptom, not a diagnosis. Drought, poor irrigation coverage, fertilizer burn, insects, pet damage, compaction, and disease can look similar from the porch. Document the pattern, how quickly it changes, recent products, watering, and weather.
| Concern | Typical context or clue | First useful response |
|---|---|---|
| Brown patch | Fescue in warm, humid weather; patches and leaf lesions | Review leaf wetness, drainage, mowing, and nitrogen; seek diagnosis if spreading |
| Gray leaf spot | Fescue with irregular decline in warm, humid weather; may resemble brown patch | Get a confirmed diagnosis; management differs from a generic brown-patch treatment |
| Spring dead spot | Bermuda with dead areas evident during spring green-up | Map recurring patches and seek a grass-specific diagnosis and seasonal plan |
| Large patch | Warm-season turf, particularly zoysia and other susceptible species; cool, wet transition periods | Examine the active edge and drainage; avoid treating it as ordinary fescue brown patch |
| Dollar spot | Small straw-colored spots, sometimes merging; prolonged leaf wetness | Confirm lesions and review species-appropriate fertility and irrigation |
| Pythium blight | Rapid deterioration under favorable hot, wet conditions; sometimes greasy or matted turf | Seek prompt identification; avoid blindly adding more water |
| Heat or drought stress | Dry soil, uneven coverage, curled leaves, footprinting | Check soil and sprinkler distribution before choosing a fungicide |
NC State explains brown patch, large patch, dollar spot, and Pythium blight separately because their biology and management differ.
Fescue can also develop gray leaf spot; Bermuda may develop spring dead spot. Similar-looking patches do not necessarily need the same treatment.
NC State disease identification guides
Open a guide for photographs, identification details and management information for that disease.
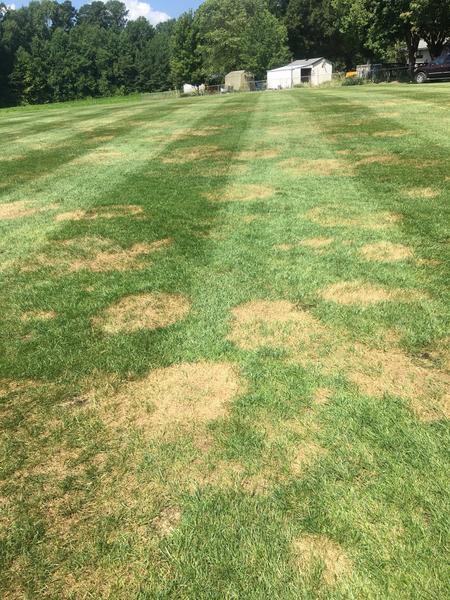 NC State ExtensionBrown patchView identification & management guide ↗
Photo from the linked NC State guide · Tall fescue
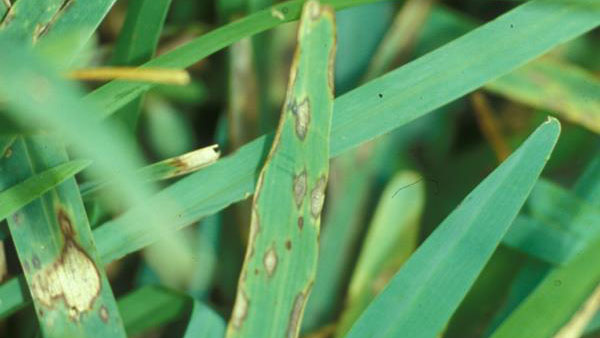 NC State ExtensionGray leaf spotView identification & management guide ↗
Photo from the linked NC State guide · St. Augustinegrass leaf lesions
 NC State ExtensionSpring dead spotView identification & management guide ↗
Photo from the linked NC State guide · Bermudagrass
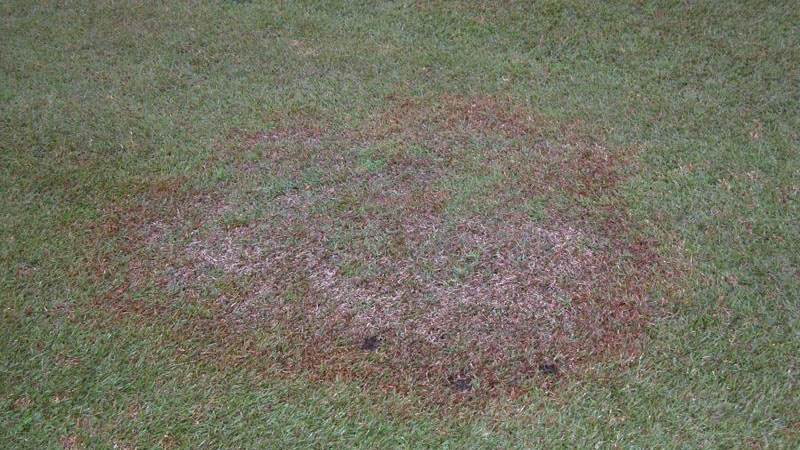 NC State ExtensionLarge patchView identification & management guide ↗
Photo from the linked NC State guide · Centipedegrass
 NC State ExtensionDollar spotView identification & management guide ↗
Photo from the linked NC State guide · Bermudagrass
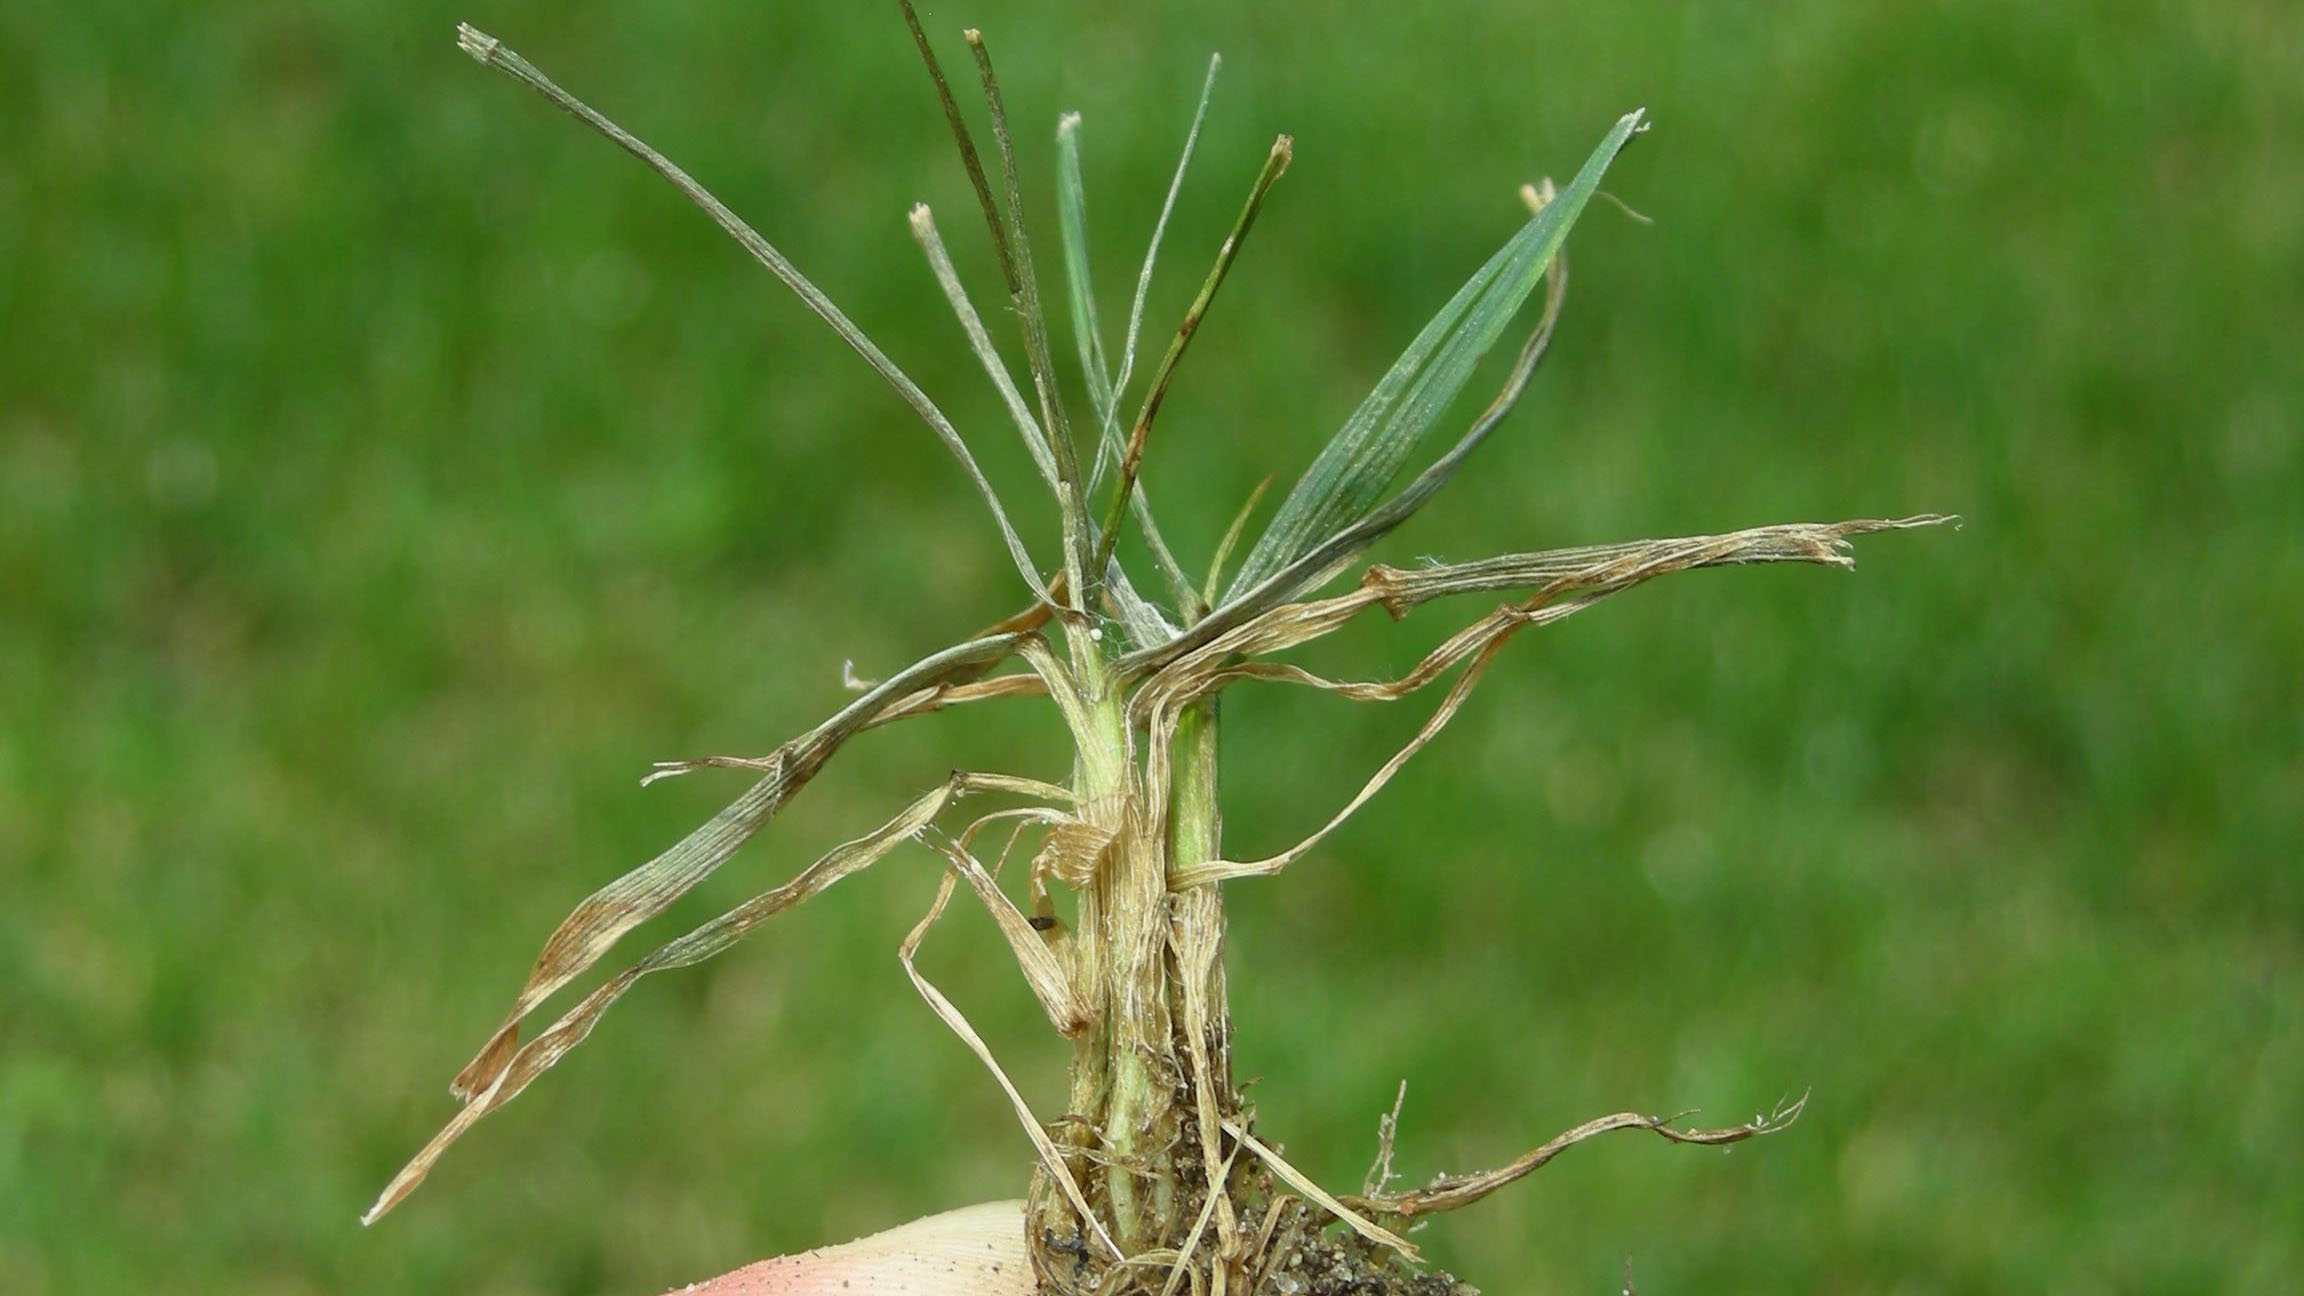 NC State ExtensionPythium blightView identification & management guide ↗
Photo from the linked NC State guide · Tall fescue
For established lawns, reduce avoidable prolonged leaf wetness by using suitable early watering, improving airflow where practical, and correcting drainage. Keep mower blades sharp and follow the species mowing height. Do not chase dark green color with additional fertilizer during an unexplained outbreak.
Fungicide selection depends on the actual pathogen, grass, product label, and timing. This guide intentionally does not prescribe a blanket chemical schedule. Recurring or rapidly spreading symptoms may warrant Extension or laboratory diagnosis and a targeted professional treatment plan. Buying a bag labeled “fungus control” without identifying the issue can waste money and delay correction.
Photograph the overall lawn and close-up leaves. When seeking a diagnosis, ask how to collect an appropriate sample from the transition between healthy and affected turf; a completely dead patch may be less useful.
13. Weeds, Insects, Pets, and Other Lawn Stress
Weed Prevention and Control
Dense, well-adapted turf limits opportunities for weeds, but new sod can still contain or develop them. Identify the weed and the turf before choosing a treatment. Bermuda, zoysia, centipede, St. Augustine, and fescue do not tolerate all products equally.
Read the label for use on newly sodded lawns, required establishment or mowing intervals, and restrictions around trees and beds. Do not copy a mature lawn’s spring preemergence program onto fresh sod. Likewise, a preemergence treatment can conflict with planned fall fescue overseeding.
Watch New Sod for Armyworms
Fall armyworms can damage turf quickly, and NC State identifies newly installed sod as particularly susceptible. Look for chewed foliage and an advancing boundary between healthy and damaged grass. If damage progresses rapidly, identify the pest promptly rather than assuming the lawn needs water or fertilizer. NC State fall armyworm guidance.
White grubs can damage roots and make turf loose, but loose new sod also simply may not be rooted yet. Inspect before treating. Treatment timing depends on the insect’s life stage, not just the month on a generic bag. White grubs in turf.
Manage Wear and Small Sources of Damage
Move play equipment periodically, protect new turf from repeated pet routes, and avoid parking on wet grass. Pet urine injury, reflected heat, downspout discharge, and mower turns can each create recurring local damage.
A repair should fit the cause. Replacing grass in a heavily used route every season may be less effective than changing access or adding a suitable path. Do not represent every thin area as a chemical problem.
14. Annual Maintenance Calendar for a North Carolina Lawn
This is a seasonal planning map for established Triangle lawns. Weather, grass growth, cultivar, and product labels take priority over month names. New sod follows its establishment plan first.
| Season | Tall fescue | Bermuda and zoysia | Tasks for every lawn |
|---|---|---|---|
| January–February | Monitor winter moisture; late-winter nutrition when appropriate | Mostly dormant; protect from concentrated wear | Soil testing, mower service, review irrigation and drainage |
| March–April | Mow as growth resumes; lighter feeding only where appropriate | Watch green-up; do not rush nitrogen onto dormant turf | Identify weeds, check coverage, avoid saturated-soil traffic |
| May–June | Prepare for heat stress and disease monitoring | Active mowing and species-specific nutrition; useful installation period | Sharpen blades, inspect pests, adjust for rainfall |
| July–August | Protect roots; avoid forcing growth during stress | Maintain active-growth mowing and water; monitor thatch and pests | Check dry spots, runoff, and pet/play wear |
| September–October | Primary period for renovation, aeration, overseeding, and fall feeding | Transition toward dormancy; avoid unnecessary late nitrogen | Repair irrigation issues and plan drainage work |
| November–December | Continue mowing if growing; fall nutrition according to the calendar | Reduce demand settings; monitor winter dryness | Remove smothering leaf cover and keep drains clear |
Centipede and St. Augustine need their own nutrient and mowing programs; the Bermuda/zoysia column is not a substitute. Use the NC State calendar collection for the grass you actually have.
Build a simple lawn record: cultivar, installation date, soil test, mowing height, products and application rates, rainfall, irrigation changes, and photos of recurring trouble spots. This turns next year’s maintenance into a response to your lawn’s history rather than repeated guesswork.
15. Aeration, Thatch, Overseeding, and Renovation
Core aeration removes plugs to help manage compaction. It should be timed when the grass can recover. For fescue, fall is generally the main renovation period. Established warm-season turf should be cultivated during active growth rather than immediately before dormancy.
Do not aerate new sod simply because a calendar says it is aeration month. First allow it to establish. Avoid operating on saturated soil, and mark shallow irrigation components before work.
Thatch is a layer of stems and other slowly decomposing material, not the loose clippings left by a routine mowing. Some spreading grasses accumulate thatch more readily. Dethatching can injure a lawn, particularly a slowly recovering zoysia surface; determine whether it is needed and whether the grass can recover before using aggressive equipment.
Fescue overseeding can repair thinning, while replacement sod can address a defined bare area. For spreading warm-season grasses, match the cultivar when repairing with plugs or sod. Overseeding a warm-season lawn for winter color adds another maintenance system and can interfere with spring transition; do not treat it as a default requirement.
Repeated renovation should prompt a review of light, compaction, drainage, mowing, and grass selection. A lawn that needs replacing for the same reason every year may need a different underlying plan. See NC State’s established lawn guidance.
16. Troubleshooting New Sod Before a Small Problem Grows
| What you see | What to check | Appropriate next step |
|---|---|---|
| Dry, curling edges | Edge coverage, wind, soil moisture | Adjust coverage; inspect the interface beneath the sod |
| Seams separating | Drying, stretched pieces, poor fit | Contact the installer early; correct moisture and fitting problems |
| Persistent squishy ground | Irrigation runtime, rainfall, grade, drainage | Pause unnecessary cycles and investigate saturation |
| Pieces remain loose | Temperature, root activity, moisture, contact | Reduce traffic; reassess establishment rather than mowing by date |
| Brown circles or irregular patches | Leaves, watering pattern, products, insects | Diagnose the cause before adding fertilizer or fungicide |
| Lawn changes rapidly overnight | Active pests, disease-favorable weather, delivery injury | Document and seek prompt advice |
| Uneven color in different pieces | Moisture, cultivar consistency, rooting, harvest stress | Photograph and discuss with supplier/installer |
| Water runs off before soaking in | Soil intake, slope, sprinkler rate | Use cycle-soak and assess compaction or drainage |
Contact the installer promptly when the sod is clearly deteriorating, irrigation cannot maintain moisture, or pieces are sliding. Keep delivery records and photos. A project handoff should explain whom to call and what warranty or replacement terms actually cover.
Normal warm-season dormancy is different from dead sod. Conversely, “it is just dormant” should not be used to dismiss unrooted pieces, severe drying, or drainage failure without inspection.
17. Your New Sod Plan and Printable Checklist
Print the checklist and keep it where the person watering the lawn can use it. It includes pre-installation tasks, installation-day checks, an establishment schedule, and a care log. Fill in the cultivar and installer instructions; a generic plan is incomplete until those details are known.

A printable plan for the person caring for the lawn
Three pages: preparation and installation, an establishment schedule, and a reusable moisture/rainfall log. No email required.
Dates are check-in windows. Rooting, moisture and ground firmness determine readiness.
Before Delivery
Confirm the grass and cultivar, prepare the bed, resolve drainage, measure the area, test watering coverage, and arrange access. Record any pre-installation nutrients and weed treatments. Identify who will check moisture each day and who can respond if the owner is away.
Installation Day
Check the delivered material, stagger joints, establish contact, and water promptly. Inspect several areas beneath the sod. Photograph the completed job and record the handoff instructions.
Days 1–7: Protect Moisture and Contact
Use this as a check-in period, not a guaranteed phase duration. Inspect morning and midday, adjust for weather, keep traffic off, and record rain and watering. Resolve dry edges or persistent saturation early.
Days 8–14: Check Anchoring Before Changing the Plan
Test a few edges gently and look for active growth. If the sod is attaching, begin gradually extending time between irrigations. If it is not, continue the moisture/contact assessment and ask for help rather than simply reducing water because a week has passed.
Days 15–30 and Beyond: Transition Only When Ready
Mow only after rooting, suitable height, and ground firmness are confirmed. Reintroduce use gradually. Establish the species maintenance plan and decide when the next fertilizer, weed treatment, or soil test is appropriate. Dormant or cold-weather sod may remain in earlier phases well beyond these dates.
18. DIY Installation or Professional Sod Installation?
DIY can be practical for a small, accessible area with uncomplicated soil and reliable watering. The project becomes harder when old turf must be removed, the ground is compacted, slopes need correction, or many pallets must be laid before they deteriorate.
Consider the entire job, not just the price of sod: equipment, debris removal, lifting, transport, delivery timing, soil preparation, fitting, irrigation, and care after installation. A lower-cost order is not a saving if half the material waits on a pallet while the bed is still being prepared.
Ask a professional to explain the grass recommendation, preparation scope, drainage concerns, and aftercare responsibilities. A useful estimate makes exclusions visible. Confirm whether irrigation changes, imported soil, drainage work, fertilization, and follow-up visits are included or separate.
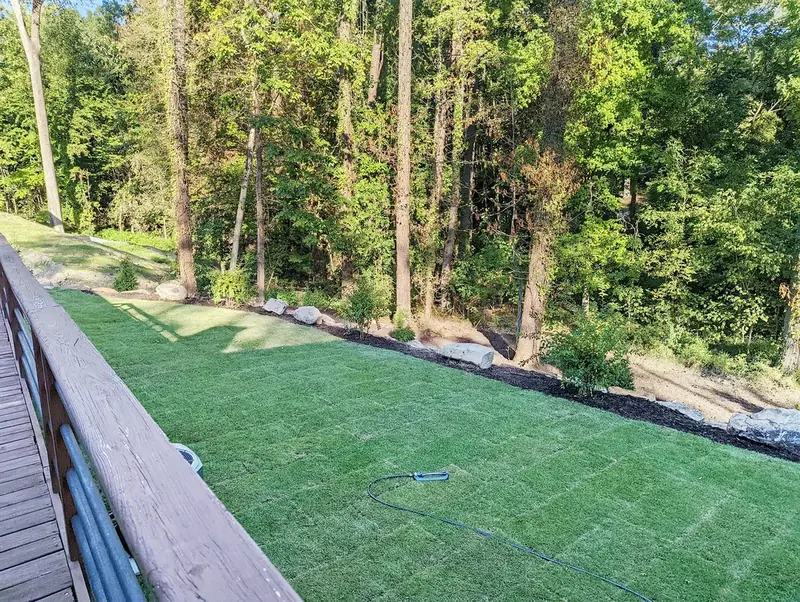
Coob’s sod installation service begins with an assessment of the property and can include agreed preparation work. If your yard’s grade, drainage, or existing damage is uncertain, a site walkthrough is a useful first step before ordering material.
19. Frequently Asked Questions About Sod
Can I Lay Sod Over My Existing Grass?
Remove the old turf and prepare the bed. Existing vegetation creates an unreliable layer between new roots and the soil. Covering it with fresh sod is not the same as establishing good contact.
Does Every Lawn Need New Topsoil?
No. The need depends on usable soil, compaction, grade, contamination, and amendment requirements. An assessment should determine what is needed; neither “always add topsoil” nor “never add soil” is a sound rule.
How Long Does Sod Take to Root?
It varies with grass, temperature, season, moisture, and contact. Some actively growing sod begins anchoring within the early establishment period; a dormant installation can take much longer. Use observed resistance and growth, not a promised number of days.
How Often Should I Water Fresh Sod?
Often enough to keep the sod and interface moist while avoiding saturation. Check beneath representative pieces and adjust for weather and coverage. Established weekly targets do not apply to unrooted sod.
When Can I Mow or Let Children and Dogs Play?
Wait for adequate anchoring and firm ground; mow only when the grass also needs cutting. Resume traffic gradually. Keeping the surface green does not prove it can tolerate heavy use.
Should I Fertilize Sod Right Away?
Follow the soil and installation plan. If nutrients were incorporated during preparation, another immediate application may be unnecessary. Begin the appropriate maintenance program after establishment and follow the product label.
Which Grass Is Best for Shade in the Triangle?
Fescue can be appropriate for moderate shade and some zoysias tolerate light shade, but no turf is a dependable solution for deep shade with heavy root competition. A planting bed may provide a more durable result.
Can I Install Sod Without In-Ground Irrigation?
A functioning hose-and-sprinkler plan may work if it covers the full area reliably and someone can manage it. Test the system before delivery; access to a hose alone is not proof of adequate coverage.
Is Brown Bermuda or Zoysia in Winter Normal?
Warm-season dormancy normally changes the color. Still check for erosion, drying, loose sod, and localized damage; winter color alone does not diagnose lawn health.
Will Sod Fix My Drainage Problem?
No. Persistent pooling, concentrated runoff, or an unsuitable grade should be evaluated before installation. Otherwise the new turf may repeat the old lawn’s failure.
How Much Does Sod Installation Cost?
Grass, area, removal, preparation, grade, access, delivery, and scope all affect cost. Request an itemized site-specific estimate instead of comparing only the square-foot sod price.
Can I Use Weed-and-Feed on New Sod?
Do not assume it is suitable. Confirm the turf species, label restrictions for new sod, and timing. Combining nutrients and herbicide in one product does not eliminate establishment restrictions.
20. Start With a Lawn Plan That Fits Your Property
A successful sod project brings grass selection, soil preparation, installation, and aftercare together. If one part is missing, an attractive installation can become a difficult maintenance problem.
Coob’s Landscaping serves homeowners in Chapel Hill and surrounding Triangle communities. Its sod service page describes fescue, Bermuda, and zoysia installation, property assessment, agreed preparation, coordinated delivery, and aftercare guidance. Confirm your address and scope when requesting a quote.
Tell us what is happening now: bare ground, worn grass, a construction site, a shaded lawn, or recurring wet spots. We can start with the conditions and discuss a sod installation plan for your property.
Request a Free Sod Installation Estimate or call (919) 218-0937 to speak with Corby.
Sources and Further Reading
The guide uses university Extension and state soil-testing resources as its technical foundation. Regional calendars are planning references, not a guarantee for every cultivar or site. Product labels and site-specific guidance determine treatments. Extension sources do not endorse Coob’s Landscaping.
- NC State: Carolina Lawns
- NC State: Organic Lawn Care — Establishing a New Lawn
- NC State: Organic Lawn Care — Maintaining an Established Lawn
- NC State: Extension Gardener Handbook — Lawns
- NCDA&CS: Collect Soil Samples
- NC State: Tall Fescue Lawn Maintenance Calendar
- NC State: Bermudagrass Lawn Maintenance Calendar
- NC State: Zoysiagrass Lawn Maintenance Calendar
- NC State: Centipedegrass Lawn Maintenance Calendar
- NC State: St. Augustinegrass Lawn Maintenance Calendar
- NC State: Water Requirements of North Carolina Turfgrasses
- Clemson: Lawn Establishment
- UGA: Soil Preparation Essential for Sod Success
- NC State: Brown Patch in Turf
- NC State: Large Patch in Turf
- NC State: Dollar Spot in Turf
- NC State: Pythium Blight in Turf
- NC State: Fall Armyworms in Turf
- NC State: White Grubs in Turf